
How to Start with the WATERMARK IMAGE TOOL
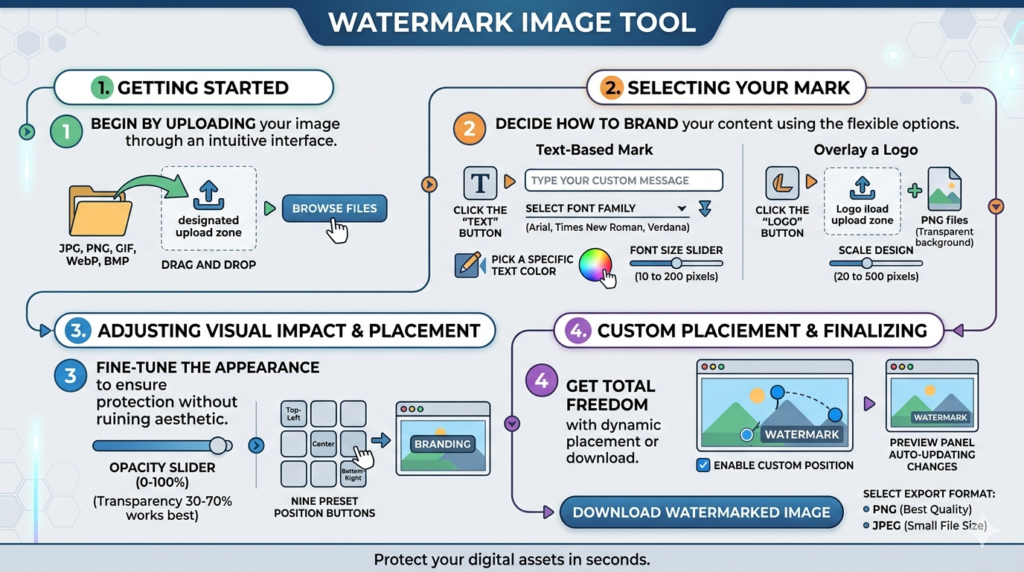
Getting started with our online WATERMARK IMAGE TOOL is a straightforward process designed to protect your digital assets in seconds. You can begin by uploading the image you want to secure directly through an intuitive interface. The WATERMARK IMAGE TOOL accepts multiple file types, so you simply need to drag your JPG, PNG, GIF, WebP, or BMP file from your computer and drop it into the designated upload zone. Alternatively, if you prefer navigating through your folders, you can click the “Browse Files” button to select an image manually, and the WATERMARK IMAGE TOOL will instantly prepare it for editing.
Selecting Your Mark in the WATERMARK IMAGE TOOL
Once your image is loaded, you must decide how to brand your content using the flexible options within the WATERMARK IMAGE TOOL. If you want to add a text-based mark, you should click the “Text” button located in the Watermark Type section of the WATERMARK IMAGE TOOL. Consequently, an input field will appear where you can type your custom message, and you can further personalize it by selecting a font family like Arial, Times New Roman, or Verdana from the dropdown menu. Moreover, the WATERMARK IMAGE TOOL allows you to pick a specific text color using a color picker and adjust the visual weight by moving a font size slider anywhere between 10 and 200 pixels. On the other hand, if you have a visual brand element, the WATERMARK IMAGE TOOL gives you the ability to overlay a logo instead. By clicking the “Logo” button, you activate the logo upload zone where you can select your graphic file, and for the best results, the WATERMARK IMAGE TOOL works perfectly with PNG files that have a transparent background while allowing you to scale the design between 20 and 500 pixels.
Adjusting the Visual Impact of the WATERMARK IMAGE TOOL
After adding your content, you will likely want to fine-tune the appearance to ensure the mark protects the image without ruining its aesthetic. The WATERMARK IMAGE TOOL features a dedicated opacity slider that ranges from 0 to 100 percent, so you can control exactly how visible your mark is. Because professional results often require a subtle touch, the WATERMARK IMAGE TOOL works best when you set the transparency between 30 and 70 percent, ensuring the watermark is noticeable yet non-intrusive. Additionally, controlling the placement is a critical function of the WATERMARK IMAGE TOOL, and you can instantly snap your mark to a specific area using the nine preset position buttons. These buttons, which cover spots like Top-Left, Center, and Bottom-Right, allow the WATERMARK IMAGE TOOL to automatically align your design with a single click.
Exploring Custom Placement in the WATERMARK IMAGE TOOL
If the standard grid positions do not meet your precise needs, the WATERMARK TOOL offers a dynamic custom placement feature that gives you total freedom. You simply need to check the box labeled “Enable Custom Position (Drag on Preview)” within the WATERMARK TOOL interface to activate this mode. As soon as you do this, a blue circle handle will appear on the preview, and you can click and drag this handle across the image to manually place your mark anywhere you like. The WATERMARK TOOL will respond in real-time, meaning the design follows your mouse or touch movements instantly so you can see the exact final position without any delay.
Previewing and Finalizing with the WATERMARK IMAGE TOOL
A major advantage of using our WATERMARK TOOLS is that you never have to guess how the final product will look because the preview panel updates automatically. The WATERMARK TOOLS displays your text or logo with all opacity and position changes immediately, removing the need for page reloads or guesswork. Therefore, what you see in the preview is a pixel-perfect representation of how the WATERMARK TOOLS will render your downloaded file. Once you are satisfied with the enhanced preview, you can click the “Download Watermarked Image” button to export your secured photo. Finally, the WATERMARK TOOLS will prompt you to choose between the PNG format, which is best for high quality and transparency, or the JPEG format, which offers a smaller file size ideal for quick sharing, before downloading directly to your device