
How to Access the Image Corners Free Online Tool
Getting started with this image corners free online tool is a straightforward process. You do not need to download any software or create an account. Simply navigate to the tool page to begin editing your photos immediately. The interface is designed to be intuitive for users of all skill levels. This ensures a smooth workflow from the moment you arrive.
Step 1: Upload an Image to the Image Corners Free Online Editor
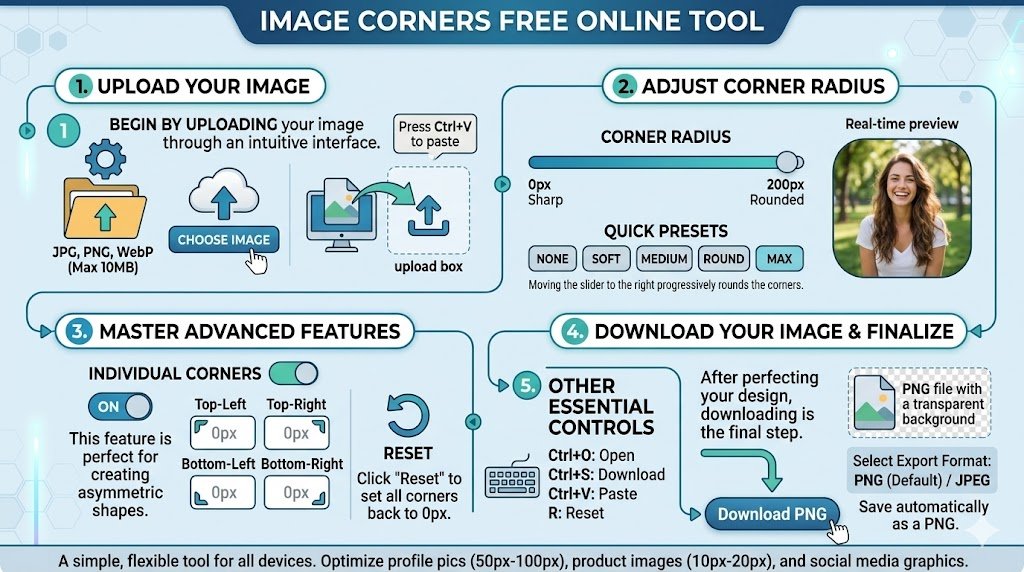
The first step in using this image corners free online tool is uploading your photo. The platform offers three flexible methods to import your file. You can click the “Choose Image” button to select a JPG, PNG, or WebP file from your computer, with a maximum size of 10MB. Alternatively, you can drag an image file directly from your desktop and drop it anywhere on the upload box. For the quickest method, copy any image to your clipboard, click on the upload area, and press Ctrl+V to paste it instantly.
Step 2: Adjust Corners with the Image Corners Free Online Slider
Once your image is loaded, the image corners free online workspace will display a preview. The primary way to edit is by using the “Corner Radius” slider. Moving the slider to the left creates sharp corners at 0px. Moving the slider to the right progressively rounds the corners, up to a maximum of 200px. The real-time preview updates immediately, showing exactly how your final image will look.
Experiment with Quick Presets for Instant Results
For immediate changes, the image corners free online tool provides several quick presets. Click the “None” button for sharp edges or the “Soft” button for a slightly rounded 10px effect. The “Medium” preset applies a noticeable 25px curve, while the “Round” option delivers a very rounded 50px look. Finally, the “Max” preset instantly applies the maximum curve of 100px, giving you a dramatic shape in one click.
Master the Advanced Individual Corners Feature
This image corners free online editor also offers advanced control for unique designs. You must toggle the “Individual Corners” switch to the ON position. Once activated, you can adjust the top-left, top-right, bottom-left, and bottom-right corners independently. This feature is perfect for creating asymmetric shapes or custom styles that a uniform radius cannot achieve.
Step 3: Download Your Image from the Free Online Tool
After perfecting your design, downloading is the final step in the image corners free online process. You can click the main “Download PNG” button located at the bottom of the controls. A second “Download” button is also available at the top of the preview panel for your convenience. The file will save automatically as a PNG with a transparent background, ready for immediate use.
Understand the Other Essential Controls
While working, you will find other valuable controls in the image corners free online interface. You can click the “Reset” button at any time to set all corners back to 0px while keeping your image loaded. To start a completely new project, you must reload the page to upload a different image. These simple controls help you correct mistakes quickly without interrupting your creative flow.
Speed Up Your Work with Keyboard Shortcuts
The image corners free online tool supports several keyboard shortcuts to boost your efficiency. Press Ctrl+O to open your file browser and select a new image. You can download your finished image instantly by pressing Ctrl+S. For pasting an image from your clipboard, simply use Ctrl+V. Additionally, pressing the “R” key will reset all settings, provided you are not actively typing in a text field.
Using the Image Corners Free Online Tool on Different Devices
This image corners free online solution is fully responsive across all your devices. On a desktop or laptop, you will see the full workspace with the preview and controls arranged side-by-side. When using a tablet such as an iPad, the workspace stacks vertically with touch-friendly sliders while retaining all features. On a mobile phone, you get a full-screen optimized layout with large touch targets and swipe-friendly controls that work seamlessly in both portrait and landscape orientation.
Follow a Complete Workflow Example
A typical editing session with this image corners free online tool follows a simple sequence. Open the tool and upload an image by clicking the “Choose Image” button. Next, adjust the corners using the slider to a value like 25px and watch the live preview update in real time. You can then fine-tune the result with the individual corners feature if needed. The final action is to download your smoothed image as a PNG file with a transparent background.
Discover Essential Tips and Tricks for Best Results
To get the best results from this image corners free online editor, start with images that have clear subjects. It is wise to begin with a preset and then fine-tune the radius manually to achieve a professional look. For profile pictures, set the radius between 50px and 100px on a perfectly square image to create a flawless circular effect. When preparing product images, a subtle radius of 10px to 20px maintains a clean and professional appearance. For social media graphics, remember that different platforms often look best with specific styles, such as 20px to 30px for Instagram and 10px to 15px for Facebook.