
How to Upload an Image Using a FREE IMAGE CROP Tool
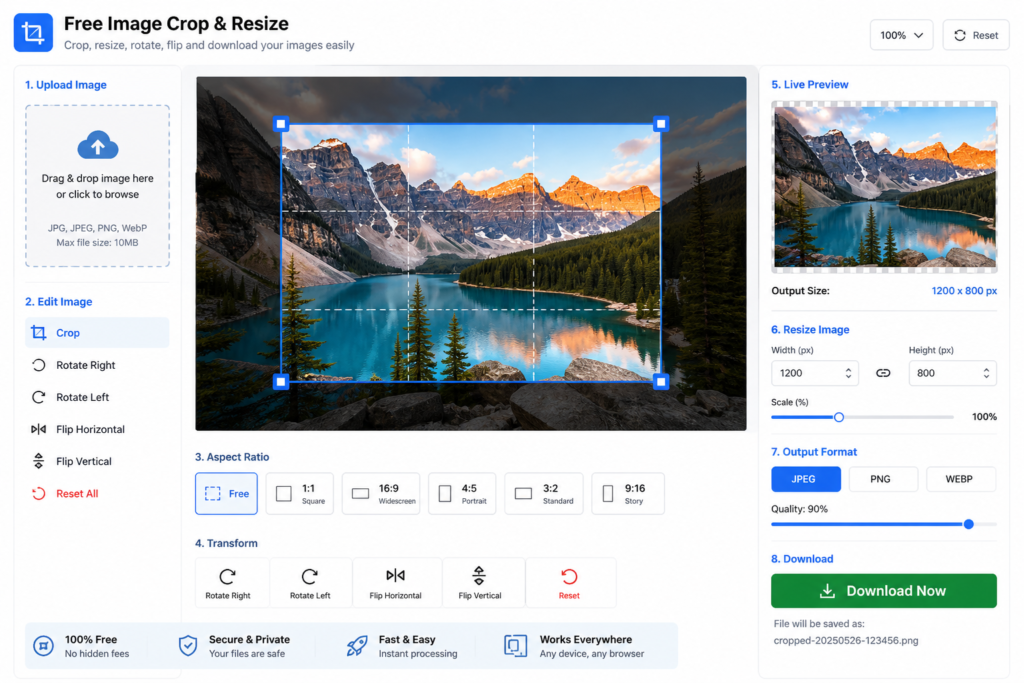
Getting started with a FREE IMAGE CROP tool begins with uploading your picture. You will notice a clearly marked upload area on the page, which is usually indicated by a dashed border box. Two simple methods are available for you to add your file. The first method involves dragging any JPG, PNG, or WebP image directly from a folder on your computer. You can simply drop the file onto the upload area, and the image will load automatically for you. Alternatively, you can click anywhere on the upload area to open a file browsing window. From there, you just need to locate and select your image file before clicking the “Open” button. Once you complete this action, the image loads instantly into the FREE IMAGE CROP workspace. The supported file types you need to use are JPG, JPEG, PNG, and WebP.
How to Perform Basic Cropping with a FREE IMAGE CROP Editor
Once your image is loaded, you will see a blue crop box overlaying it, which is the core of the FREE IMAGE CROP function. The bright area inside the box represents the part of the photo you will keep. Meanwhile, a dark overlay covers the outer edges to show exactly what will be removed during the process. To move the crop box to a different subject, you can click inside the blue area, hold down your mouse, and drag it to the perfect position. If you are using a mobile device, simply tap and hold inside the crop box and move your finger to reposition it. When you release the box, it will lock into the new location.
How to Resize the Selection in a FREE IMAGE CROP Tool
You can make precise adjustments by using the four blue square handles located at the corners of the crop box. If you click and drag the top-left handle, you can resize the selection diagonally from that corner. Similarly, dragging the top-right, bottom-left, or bottom-right handles allows you to shrink or expand the box with pinpoint accuracy. For the best control over your FREE IMAGE CROP selection, it is helpful to drag these corner handles diagonally. This technique ensures you can easily frame your subject without accidentally moving the entire overlay.
How to Use Preset Ratios in a FREE IMAGE CROP App
Directly below the image, you will find ratio buttons that make a FREE IMAGE CROP session incredibly efficient for specific platforms. The “Free” button removes all restrictions and allows for completely custom and freeform cropping. Selecting the 1:1 ratio instantly locks the box into a perfect square, which is best for Instagram posts and profile pictures. If you need a widescreen result, the 16:9 ratio is ideal for YouTube thumbnails and blog headers. Additionally, the 4:5 button creates a vertical portrait shape perfectly suited for Instagram portrait mode or Pinterest. When you click any of these buttons, the crop box automatically adjusts to the selected shape, and dragging the corners will maintain that locked aspect ratio. The active ratio button will glow blue so you always know which setting is applied, and you can click “Free” at any time to remove the lock.
How to Rotate an Image Inside a FREE IMAGE CROP Interface
The transform tools located near the ratio buttons are essential for fixing orientation using a FREE IMAGE CROP tool. The rotate right function turns your image 90 degrees clockwise with every click. Therefore, if you click it twice, you get a 180-degree turn, and four clicks will bring the picture back to the original orientation. You can also use the rotate left button to turn the image 90 degrees counterclockwise, which produces the same result as clicking rotate right three times. These rotations happen instantly, allowing you to view the changes in real time.
How to Flip an Image with a FREE IMAGE CROP Feature
You can also create mirror effects within the FREE IMAGE CROP editor. The horizontal flip option mirrors your image from left to right, creating a perfect reflection effect; you just need to click it again to undo the change. If you select the vertical flip option, the image mirrors from top to bottom, effectively turning it upside down with one click. These flip tools are completely non-destructive and can be toggled off instantly. If you ever need to start over, the dedicated Reset button removes all rotation and flip changes you have applied. This action also restores the crop box to its default state and clears any locked ratios, giving you a clean slate.
How to Use the Live Preview in a FREE IMAGE CROP System
On the right side of the screen, the preview panel shows you a real-time result of your FREE IMAGE CROP adjustments. The display updates automatically whenever you move the crop box, resize the selection, or change the aspect ratio. This dynamic panel also shows you the exact pixel dimensions of the final output, so there are no surprises later. Within the preview, the white area clearly represents your final cropped image. A checkerboard background indicates transparent areas, should your design require them, ensuring you know exactly what your file contains.
How to Download Your File from a FREE IMAGE CROP Website
The final step is straightforward once you are satisfied with the live preview. First, make sure you have applied all necessary rotations, flips, and aspect ratio adjustments. Verify the final size and positioning by checking the preview panel one last time. When you are ready, simply click the “Download Cropped” button to save the picture to your device. The image will be saved as a high-quality PNG file so you do not lose clarity. Consequently, your browser will download a file named “cropped-[timestamp].png,” and you can immediately use your new image anywhere you like.