
Quick Compress
Drag & Drop Images Here
Supports JPEG, PNG, WebP, GIF (Static)
Compression Settings
Processed Results
| Preview | File Name | Original | Optimized | Savings | Action |
|---|
How to Access the Image Compressor Tool Free Interface
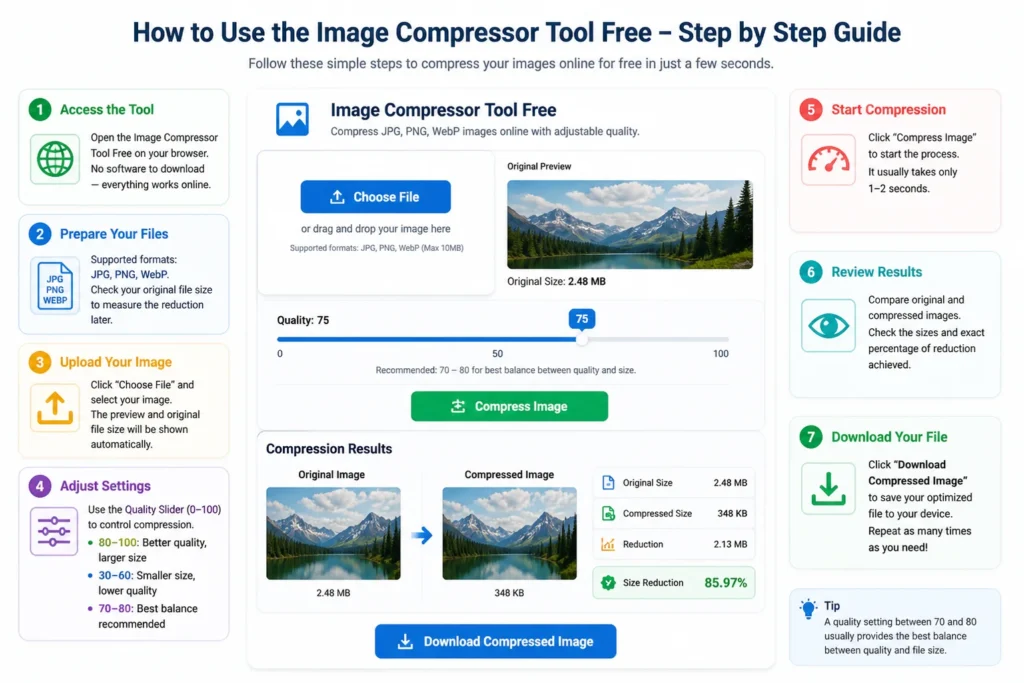
The first step in using the Image Compressor Tool Free is navigating to its dedicated page on the website. The tool loads directly in your browser, which means there is no need to download any software to begin. The layout is designed to be straightforward, allowing you to see all the necessary controls immediately. You will notice the upload area and the quality settings are placed front and center for quick access.
Preparing Your Files for the Image Compressor Tool Free
Before you interact with the Image Compressor Tool Free, it helps to know which image formats are supported. The tool accepts JPG, PNG, and WebP files, making it versatile for photos, screenshots, and web graphics. It is a smart practice to check your original file size first so you can later measure the exact reduction achieved by the process. Knowing your starting point helps you make better decisions about the final compression level.
How to Upload with the Image Compressor Tool Free
The upload process for the Image Compressor Tool Free begins with a simple button click. You need to locate and click the “Choose File” button to open your device’s file explorer. From there, you can select any image in a supported format such as JPG, PNG, or WebP. After you complete the upload, an image preview will instantly appear inside the tool. Additionally, the original file size will be displayed clearly so you have a record of the starting data usage.
Adjusting Settings in the Image Compressor Tool Free
The most important feature of the Image Compressor Tool Free is the Quality Slider, which ranges from 0 to 100. Moving the slider to a higher value, between 80 and 100, will retain sharp details but results in a larger file size. Conversely, dragging the slider to a lower value, between 30 and 60, creates a much smaller file size by reducing visual clarity. The recommended setting for the best balance is usually a range between 70 and 80, which significantly shrinks the file without obvious quality loss. Experimenting with the slider lets you customize the output according to your specific project requirements.
Starting the Compression Process with the Image Compressor Tool Free
Once your ideal setting is configured, you must initiate the processing in the Image Compressor Tool Free. You simply press the “Compress Image” button to begin the optimization routine. This triggers a fast AJAX processing sequence that typically completes within one to two seconds. The immediate feedback ensures your workflow remains uninterrupted and efficient.
Reviewing Your Results in the Image Compressor Tool Free
After the processing finishes, the Image Compressor Tool Free presents a detailed overview of your compression results. The display will show you a direct visual comparison between the original image and the compressed image. Alongside the visual proof, the tool lists the original size, the new compressed size, and the exact percentage of size reduction achieved. This transparent reporting lets you verify that the file is now lean enough for websites, emails, or social media platforms.
Downloading Files from the Image Compressor Tool Free
The final step is to secure your optimized file using the Image Compressor Tool Free. You just need to click the “Download Compressed Image” button to save your work. The optimized image will instantly download directly to your device’s default storage location. Following this simple flow makes the tool a seamless part of your daily media management routine. You can repeat the process as many times as you need to handle large batches of images throughout the day.